Office 365 is a cloud-based service that includes tools like OneNote, Teams, OneDrive, etc. It has artificial intelligence features that provide a competitive edge, reduce your working time, and offer ideas to improve task performance. In this article, we will learn how to add individual accounts and multiple users account through the admin center. It is a great choice for individuals, businesses, and organizations.
Table of Content
What is Microsoft Office 365?
Microsoft Office 365 is Created by Microsoft to help people work, learn, and communicate easily. It is a cloud-based service which means you can access it from the internet anywhere and anytime. It consists of applications like PowerPoint for making presentations, OneDrive for cloud storage, Outlook for managing our emails, Teams for chat-based workspace, and more.
Here are the features of Microsoft Office 365
Cloud Storage: We can use One Drive as an example to store files. As long you are connected to the internet it can accessed from anywhere.
Collaboration Tools: Apps like Microsoft Team and SharePoint allow people to work together from different parts of the world.
Work on all Devices: Microsoft Office 365 works on all operating systems like Windows, Mac, and Android smoothly without any problems.
Security: It keeps your information safe and protected like the digital lock on your system.
AI-Powered Features: Microsoft’s artificial intelligence tools enhance the efficiency of Word and PowerPoint, enabling better writing and presentations.
Regular Updates: You don’t need to worry about the old versions. It will keep you updated with the latest versions.
Flexible Plans: Whether you’re an individual, family, small business, or large enterprise, there’s a Microsoft 365 plan designed to fit your needs.
How to Add a Single Account in Office 365
If you are in charge of the school and someone joins newly, you will need to add them to Office 365 so they can start using the tools. Setting up their account is simple! Here’s how to do it:
Sign in to Office 365 Admin Center: You need to log in to add and give them access to the platform. Open admin.microsoft.com websites on your web for that you must enter your username and password.
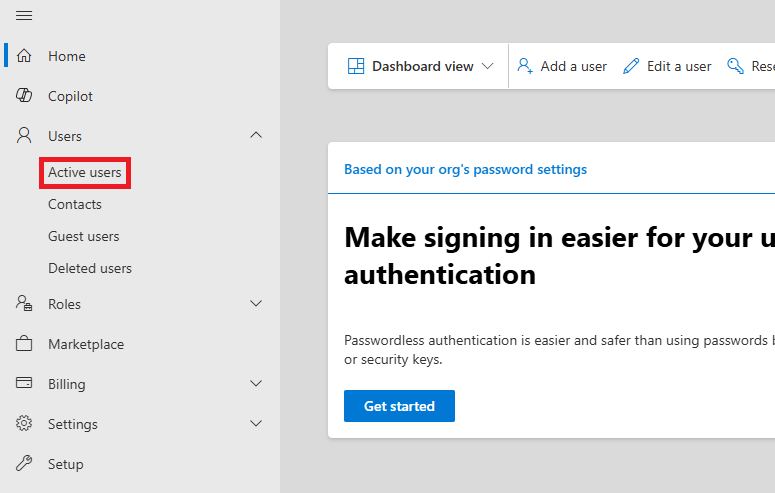
Go to User Management: After entering your login credentials, the dashboard page will appear. On the left-hand side, click on “Users,” and then select “Active Users.” This section lists all individuals who are using Office 365.
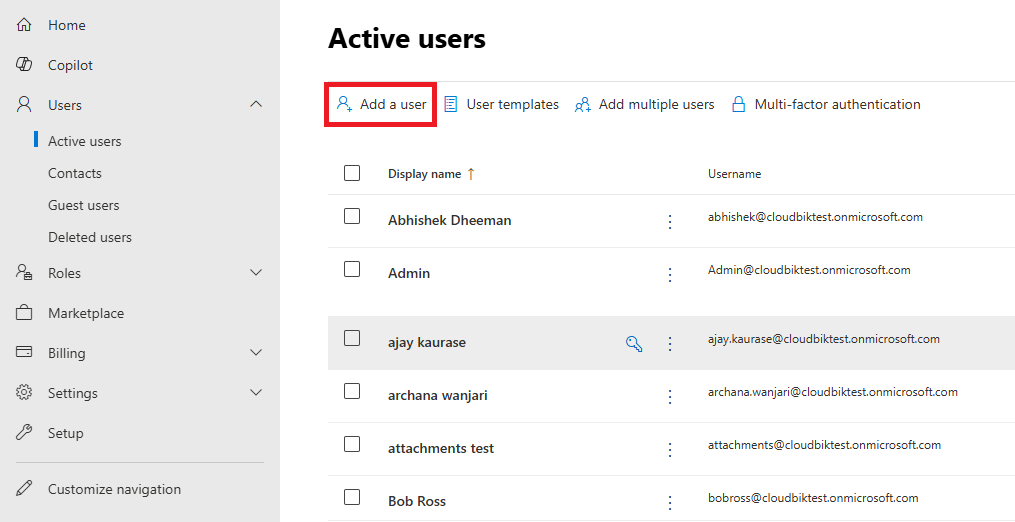
Add a New User: Select on Add a User button to add a new user to the Microsoft Office 365 account.
Enter User Details: A form will appear on your screen you need to fill in all the details like first name, last name, display name, and user name.
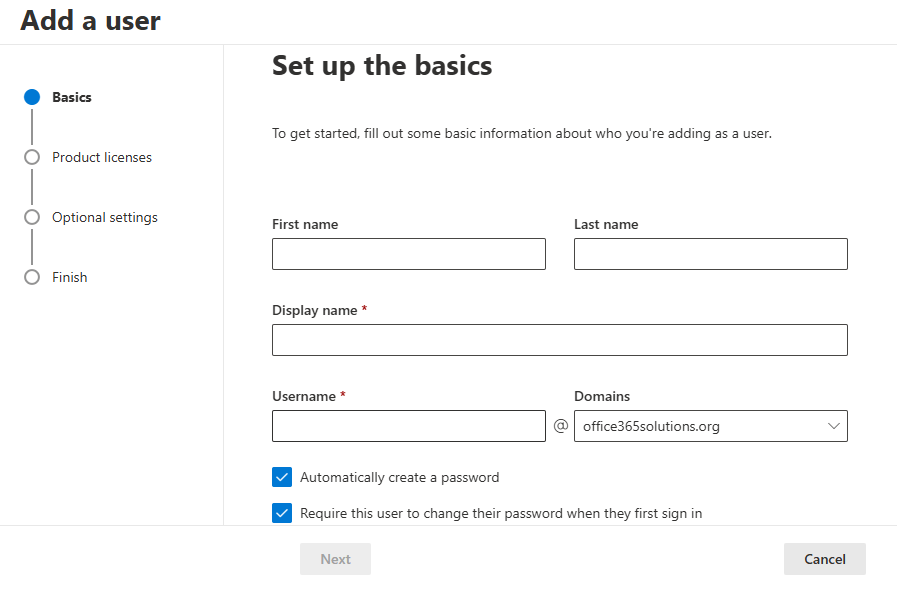
Set a Password: You can create a password or use a system-generated password for the User and send it through mail.

Assign a License: This step is crucial! All Office 365 tools will function properly if you assign a license to the new user. You can think of a license as a ticket that allows access to these tools. Make sure to choose a license that fulfills the requirement, such as Microsoft 365 Business Standard.
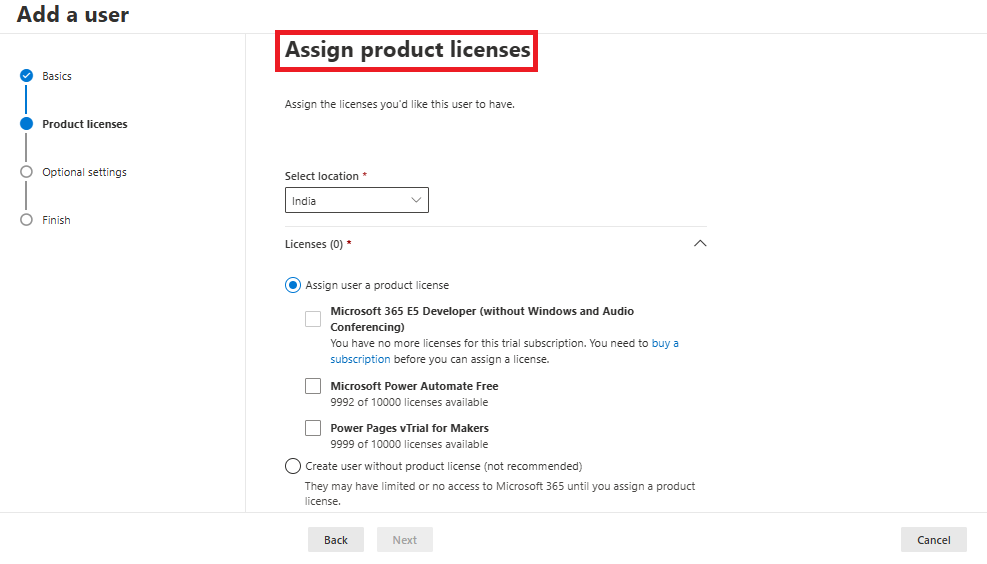
Review and Finish: Double-check all the details that you have entered on the form to make sure the details are correct and then click on the finish button. Hurrah! A new user account has been created and details in sent through the mail for login.

How to Add Multiple Accounts in Office 365
If you need to add a large number of users to Microsoft Office 365, doing it one by one can be time-consuming. Fortunately, Office 365 offers a solution: you can create a file in Excel and then convert it to CSV format to add bulk users through the Microsoft 365 admin center. Here is a clear, step-by-step guide on how to accomplish it.
Add Bulk User: Log in to Microsoft Office 365, navigate to Users > Active users, then select Add Multiple Users.

Download and Prepare a CSV File: To add multiple users to Office 365, you can download a sample CSV file from Office 365 and make changes to it. Ensure that the first row remains unchanged, and fill in all the respective columns’ details, including username, first name, last name, display name, and so on.
Upload CSV file: As soon as your CSV file is ready. Select the file by clicking the browse button. The file will be automatically validated, and any error will be reported to you.

Assign Licenses in Bulk: After the file gets uploaded, click on the next button and choose the appropriate Office 365 license for the users. You can skip assigning the license and do it later also.
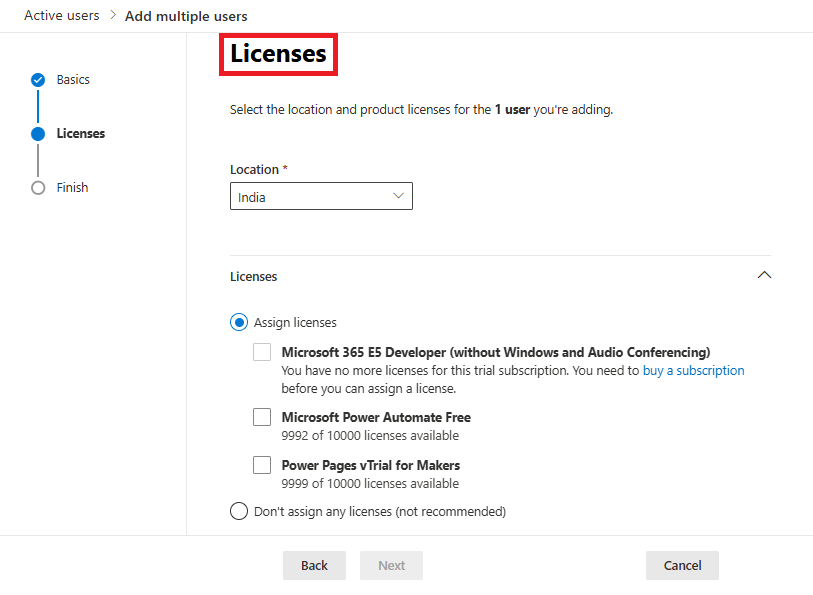
Finalize the Process: Once all the details are provided and the processes are executed, all users listed in the CSV will be added to Microsoft Office 365.

Advances Account Management Options
Role-Based Access: Assign user roles such as Global Admin, Exchange Admin, or User Management Admin according to their specific responsibilities.
Group Management: Utilize Microsoft 365 Groups, Security Groups, or Distribution Lists to enhance access to resources and improve communication management.
Password Policies: To enhance account security, establish guidelines for password expiration, and mandate the use of strong passwords.
Automated Provisioning: Automating the creation and administration of user accounts with PowerShell scripts. For instance, you can add bulk users using PowerShell.
Conclusion:
Microsoft Office 365 is a cloud-based platform that simplifies work, communication, and learning with tools like Teams, OneDrive, and PowerPoint. In this guide we have provided step-by-step instructions for adding single or multiple user accounts in Office 365, ensuring a smooth and efficient process. With features like collaboration tools, and AI-powered functionalities, Office 365 is a reliable choice for individuals and organizations. By following this guide, users can manage accounts effortlessly and boost productivity.
