In Microsoft 365, we must decide whether the right task is assigned to every user or not. If the admin gives full permission to everyone, sensitive information may be put at risk. However, if the admin gives limited access, users will not complete their tasks due to insufficient permission. The solution lies in beautiful concepts called roles. Based on user work, roles are assigned to perform the tasks in the organization. Below, we have discussed how to assign roles in Office 365.
Table of Content
- 1 What are the Roles in Microsoft 365?
- 2 How do you assign roles in Office 365?
What are the Roles in Microsoft 365?
A role is a group of permissions that defines what tasks a user can perform within the organization. There are predefined roles such as Global Administrator, Compliance Administrator, and Helpdesk Administrator, each comes with unique permissions. Also, Roles ensure that users have the necessary permission to complete their tasks while maintaining security. Assign roles in Office 365 to provide clarity, keep work organized, and improve overall efficiency.
Commonly used Admin Roles in Microsoft 365?
To get the work done smoothly and reliably, Microsoft offers a variety of roles that help businesses assign different tasks to different team members. Below, we will learn about some of the important roles of a Microsoft 365 administrator.
Global Administration: When a person signs up for a Microsoft 365 account, he becomes a Globin admin. This means he has the power to manage everything in the organization, like adding new users, managing licenses, security settings, etc.
Billing Administrator: The billing administrator manages roles that deal with the financial aspects of a Microsoft 365 subscription, such as purchasing new services, renewing subscriptions, and tracking payments.
Exchange Administrator: It can recover deleted items in users’ mailboxes and manages Microsoft groups and filters malware for the organization through email anti-spam protection.
SharePoint Administrator: Once assigned this role, the user has the following responsibilities: creating sites, deleting sites, managing sharing settings at the organization level, adding and removing site administrators, and managing site storage limits.
Above are the common roles that are used in the organization. To learn more about these roles, you can visit the Microsoft website.
How do you assign roles in Office 365?
Now we learn three methods to assign roles to the users.
- Assign roles through the Microsoft 365 admin center.
- Set roles using the Microsoft Graph PowerShell.
- Use Microsoft Entra PIM to assign roles.
Assign roles through the Microsoft 365 Admin Center
(a)Select a role and then assign it to the user.
- Sign in to the Microsoft account using this link: https://login.microsoftonline.com/
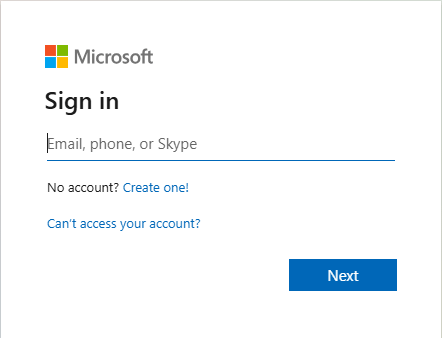
- Click on the admin button.

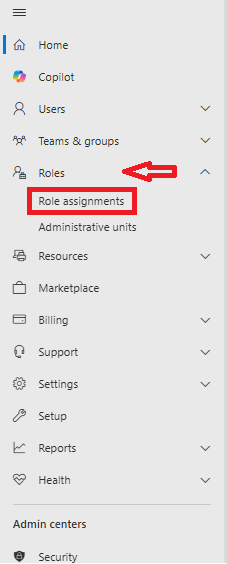
- In the drop-down menu, select the Roles section and then select Role Assignments.
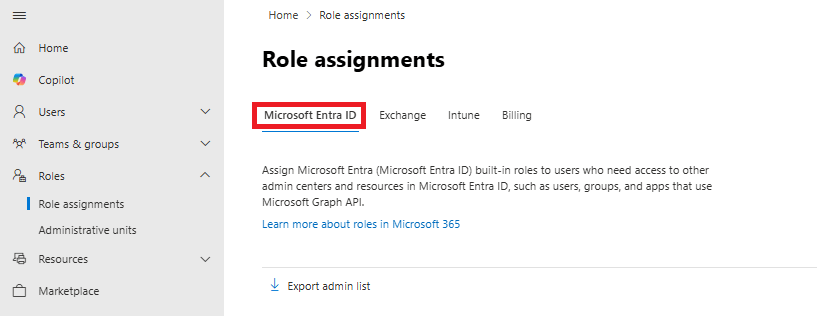
- Select the Microsoft Entra ID to view the admin roles available for your organization.
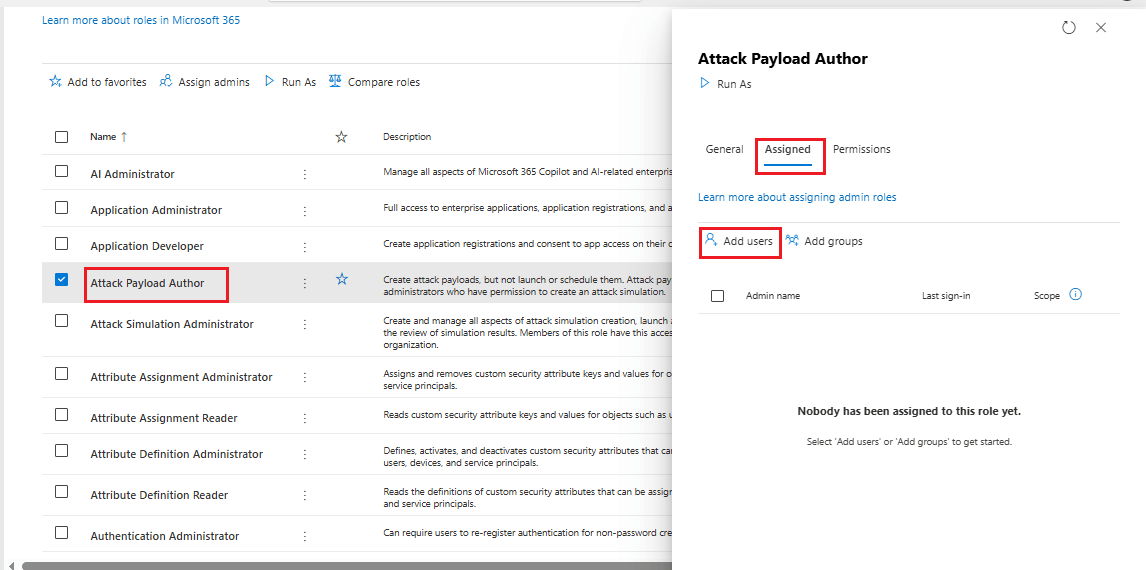
- Click on any admin role that you want to assign to the users. A new side window will appear. Here, click on the assigned tab and then add users.
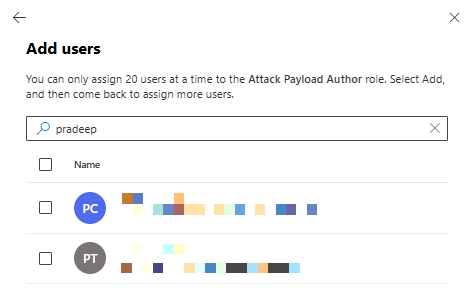
- Enter the username and select the user from the suggestion list. You can add multiple users for the roles.
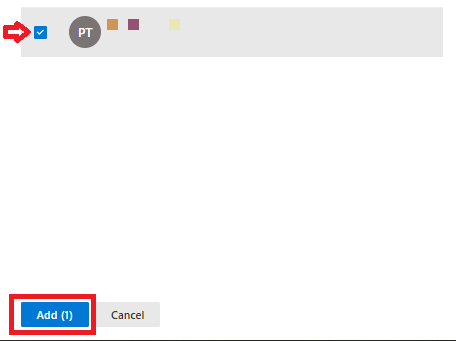
- Click on the Add button to add the user that you have selected.
(b)Select users and assign a role to them.
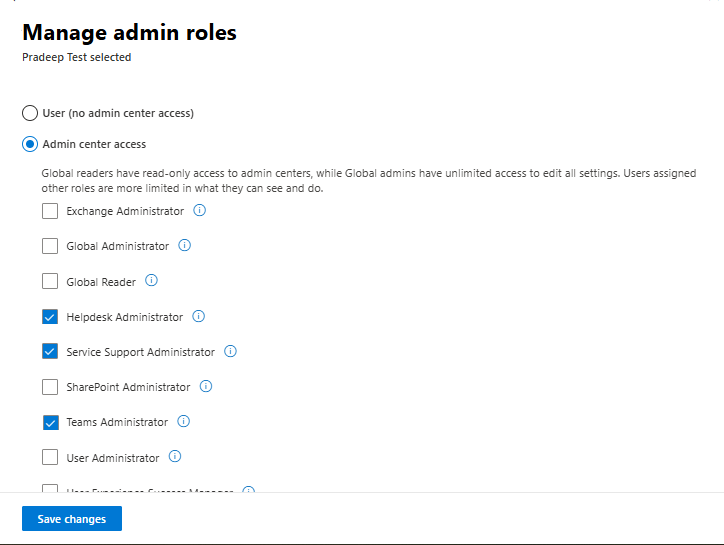
- To assign multiple roles to a single user, go to the admin center and click on the users, then active users from the left sidebar. All users will be displayed. Here, click on any user whom you want to assign the roles and then click on the manage roles.
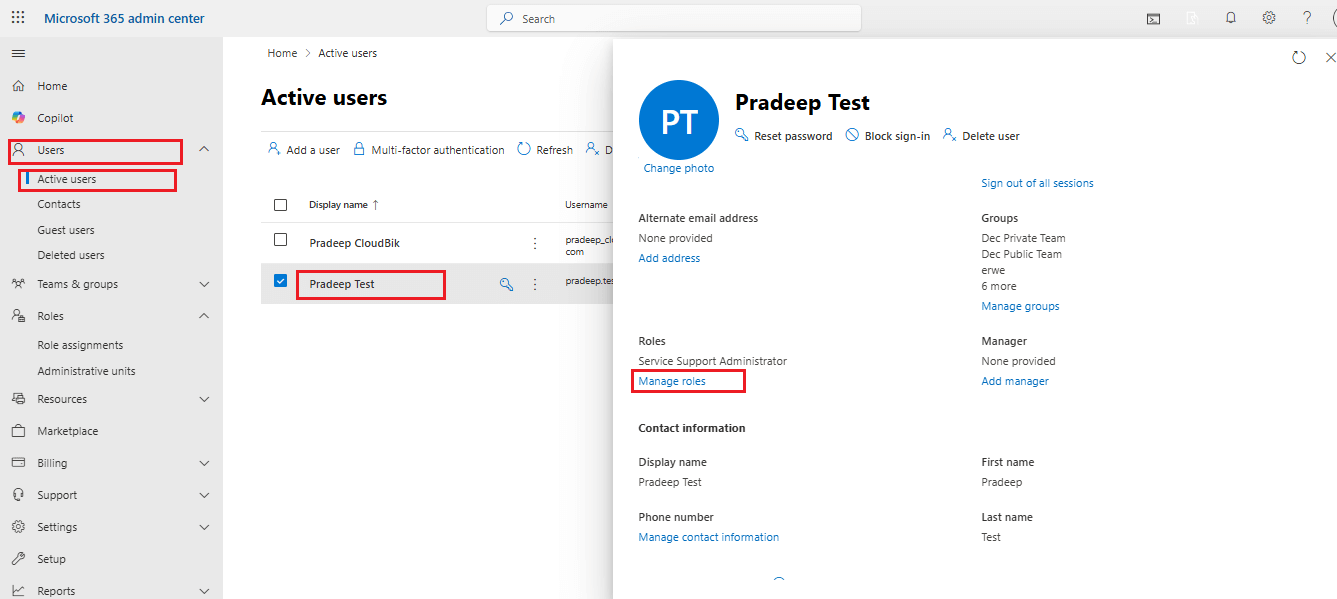
- Choose Admin Center access and select the required roles according to the work, then hit Save Changes.
Assign Roles to the Users using Microsoft Graph PowerShell
You can assign roles to users using PowerShell. It is a faster and more efficient way to manage permission. Instead of assigning permissions one by one, it enables you to manage multiple users at once.
To install the Microsoft Graph PowerShell, run the following command in the Windows PowerShell.
Install-Module Microsoft.Graph -Scope AllUsers -Repository PSGallery -Force
Ensure you have run the above command. After that, enter the below command.
$UPN="<UserPrincipalName>"

$RoleName="<AdminRoleName>"

Connect-MgGraph -Scopes "RoleManagement.ReadWrite.Directory"

$RoleId = (Get-MgRoleManagementDirectoryRoleDefinition -Filter "DisplayName eq '$RoleName'").Id

$UserId = (Get-MgUser -Filter "UserPrincipalName eq '$UPN'").Id

New-MgRoleManagementDirectoryRoleAssignment -DirectoryScopeId '/' -RoleDefinitionId $RoleId -PrincipalId $UserId
Change the <UserPrincipalName> and <AdminRoleName> with the UPN of the Microsoft 365 user and role name.
This PowerShell script first connects to the Graph API with the required access rights. It then employs the “New-MgRoleManagementDirectoryRoleAssignment” cmdlet to grant a designated role to a user. Moreover, it supports assigning both predefined and custom roles as per the requirements.
Assign Role using PIM in Microsoft Entra Admin Center
(a) Select a role and then assign it to the user
Microsoft Entra Admin Privileged Identity Management (PIM) helps give special permission to the users for a particular time period.
- After signing in to this page https://login.microsoftonline.com/, click on the admin tab located on the left side of the drop-down menu and then click on identity from the options.

- The Microsoft Entra admin center page will open, and on the left side, press the identity tab. A drop-down will appear and select the Roles & Admins, then again select Roles and Admins. Click on the role name that you want to assign to the users.
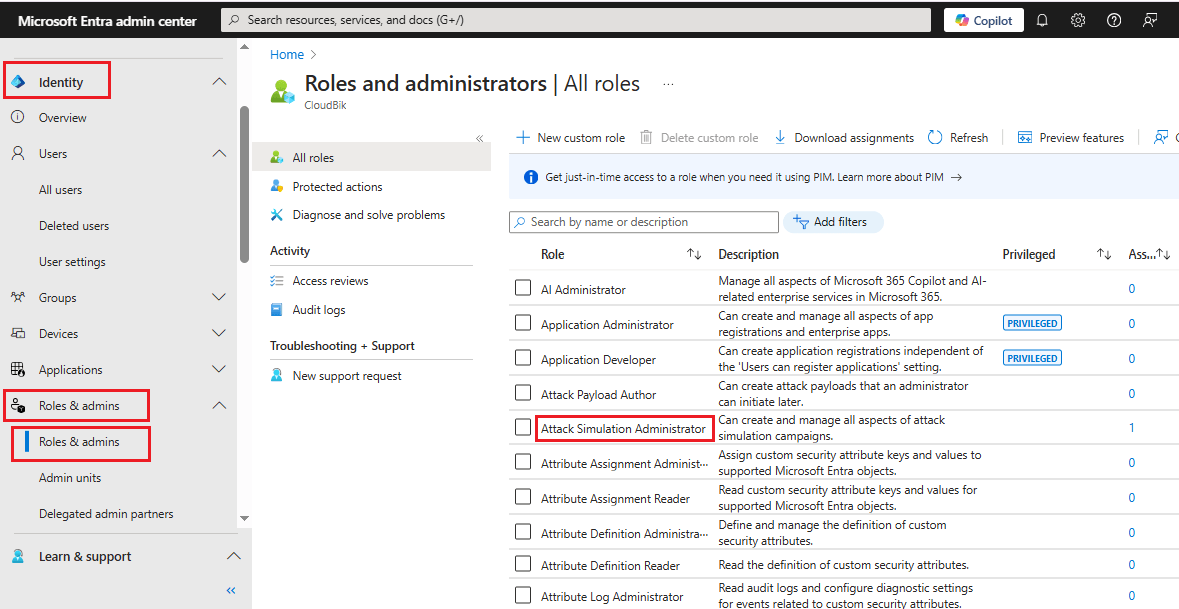
- Select the Add Assignments.
.
- In this, click on No Member Selected, then a new window pops up on the left side; select the member and hit on the select.
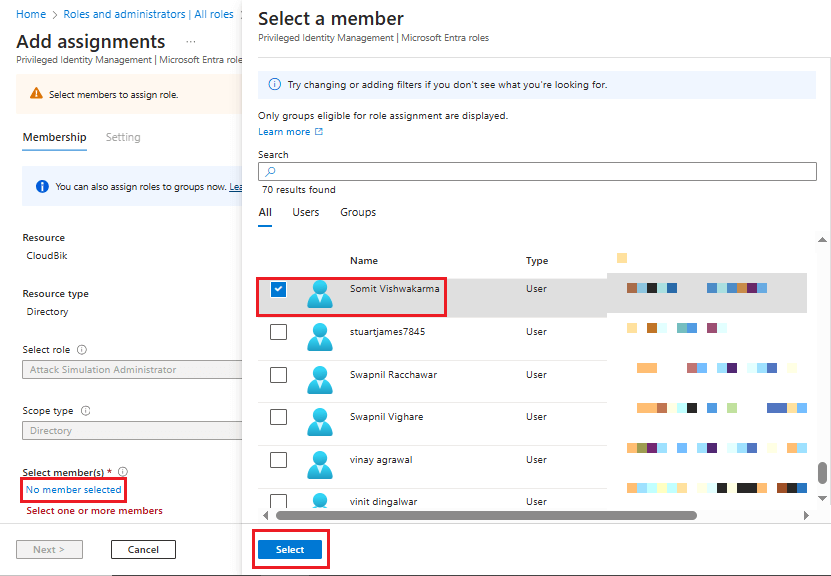
- Once a member is selected, press the Next button.

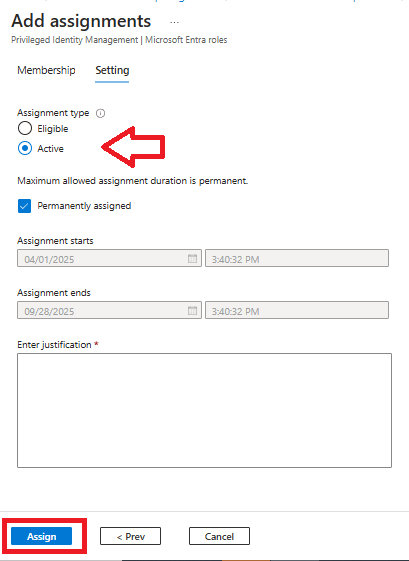
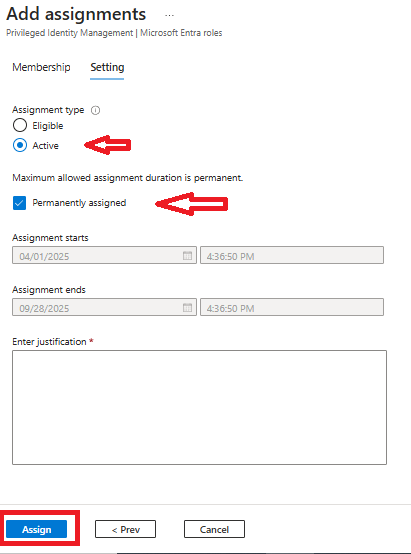
- A new page will appear; select Active on checkbox and tick the Permanent Assigned Box or uncheck it if you want to add start and end time. At last, hit on the Assign tab.
(b)Select Users and then assign role to them
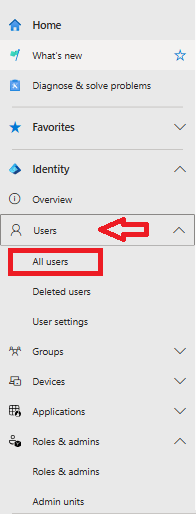
- Click on the Users and then select All Users.
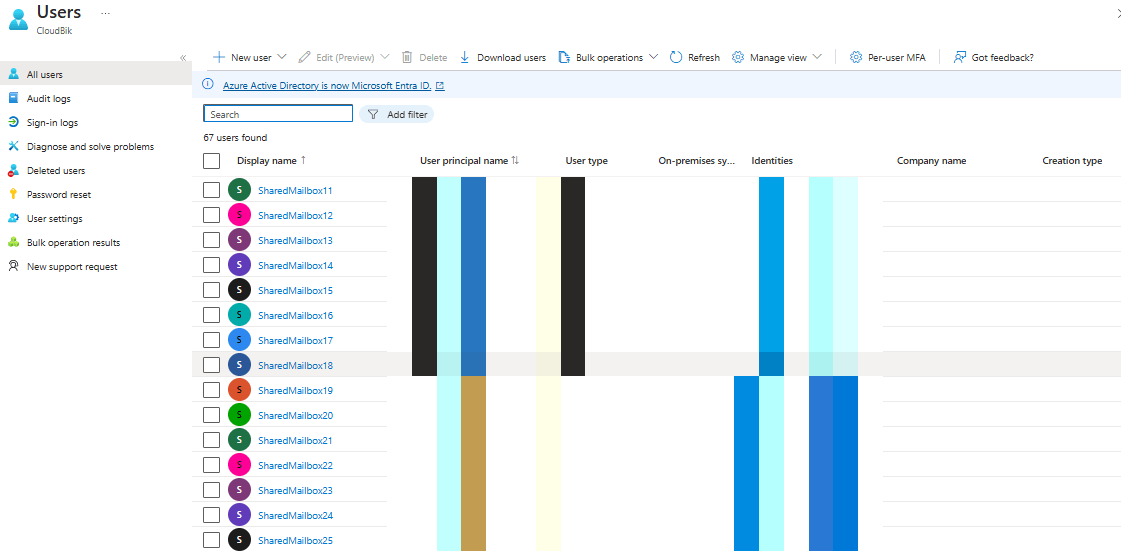
- Select a User whom you want to assign a role.
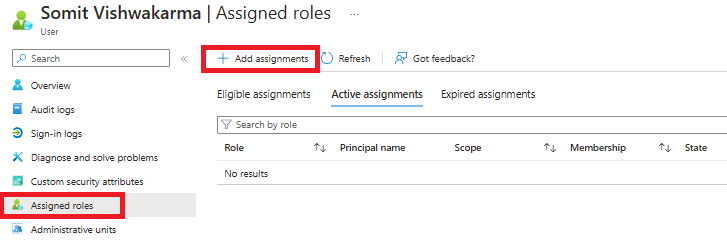
- In the user, click on Assigned roles on the left side of the screen and then click on the Add Assignment.
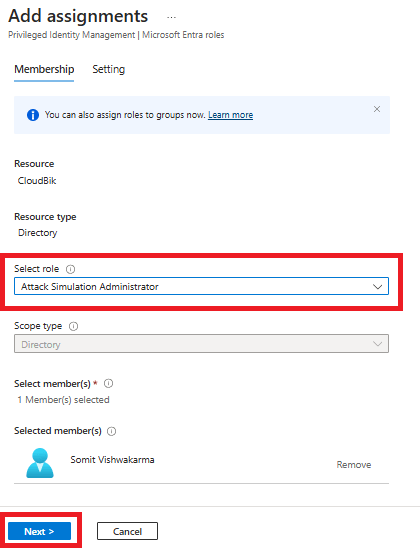
- Click on the select role and choose the role you want to assign and then click on the next button.
- Choose the active option and tick mark the permanent option and then hit on assign button.
Best Practices for Managing Roles in Microsoft 365
To ensure your organization achieves maximum efficiency and security, consider these practices recommended by experts when you assign roles in Office 365:
- Regular Audits: Maintain security and remove unnecessary permissions from users.
- Least Privilege Principle: As the name suggests, assign only the permissions that the user needs to do their job, nothing more.
- Use PIM for Sensitive Roles: Leverage privileged identity management (PIM) for high-powered roles, such as Global Admin, to limit permanent access.
- Document Role Assignments: Keep records of users, like which role is assigned to which user.
Conclusion:
Assigning roles in Office 365 is a simple and powerful way to use your organization’s resources. In the above article, we have explained three ways (Admin Center, PowerShell, or PIM) to assign roles in Office 365. Following the best practices like regular audits, the least privilege principle, etc., will help you get work done effectively while keeping your organization’s information resources secure.
Read More: Complete Guide for Adding a Domain in Microsoft 365
