Table of Content
Why do users Convert OST files to PST?
Users Convert OST files to PST because of the following reasons:
Data Recovery: To safeguard data against sudden accidents such as power cuts, viruses, etc.
Accessibility of mail: The data remains accessible even when removed from the server for any reason.
Migration: When we need to transfer files from one system to another, we must convert to PST.
Business merge or move: To transfer OST files from one system to another, converting them to PST format is essential.
Pre-requisite for manual conversion
There are mandatory requirements needed before we start the manual process:
- Outlook is installed in the system and linked with the mail account to access the OST.
- Corrupted files must be recovered before the transferring process starts.
Manual Methods to Convert OST to PST
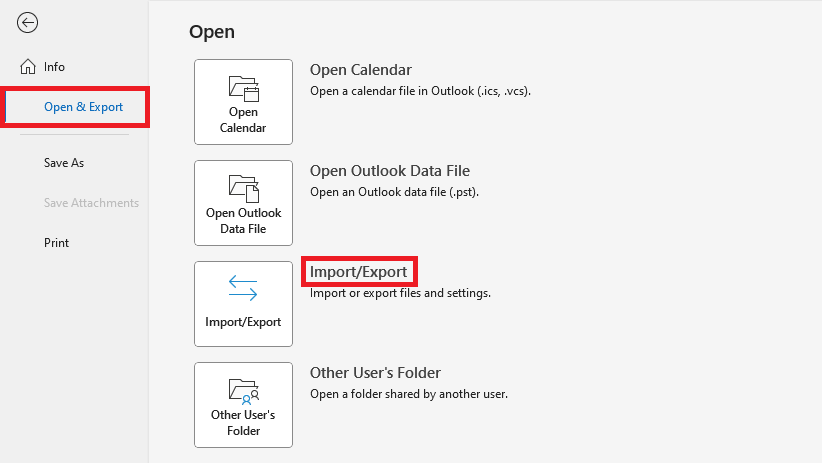
1.1 Using Import/Export Feature in Outlook
- Open the File tab in your Outlook system
- Click on Open/Export
- Then Import/Export files and settings
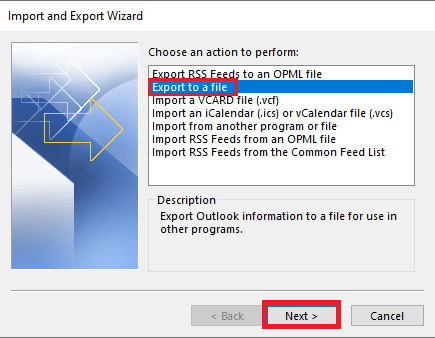
1.2 Choosing an Export option to perform
- Choose “Export to a file” in the following options
- Click Next
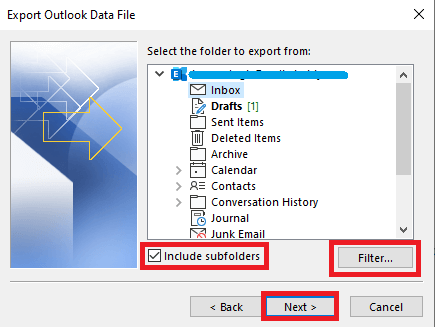
1.3 Select the file type to export
- Select Outlook data file (.PST)
- Click Next
- Ensure to click on the checkbox Include Subfolders so, that all your email data is exported.
- Also, you can choose a filter option to export more accurate items in PST file format.
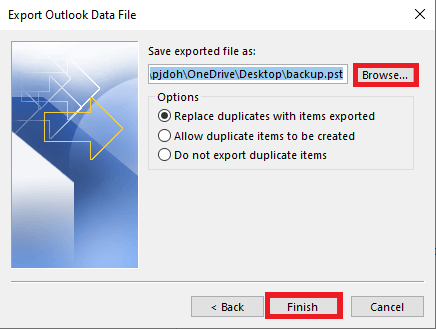
1.4 Saving a New File
Click on the browse button to select the location where you want to create the backup of OST. Now choose any one filter option then click on the Finish button to start the process.
Filter Options
- Replace duplicate with items imported
- Allow duplicates to be created
- Do not import duplicate items
2.AutoArchive to OST Data
Archived emails are used to store older, unused messages in a designated archive folder. This data remains easily accessible when needed but is typically stored in a manner that reduces its impact on system performance and enhances security.
Steps
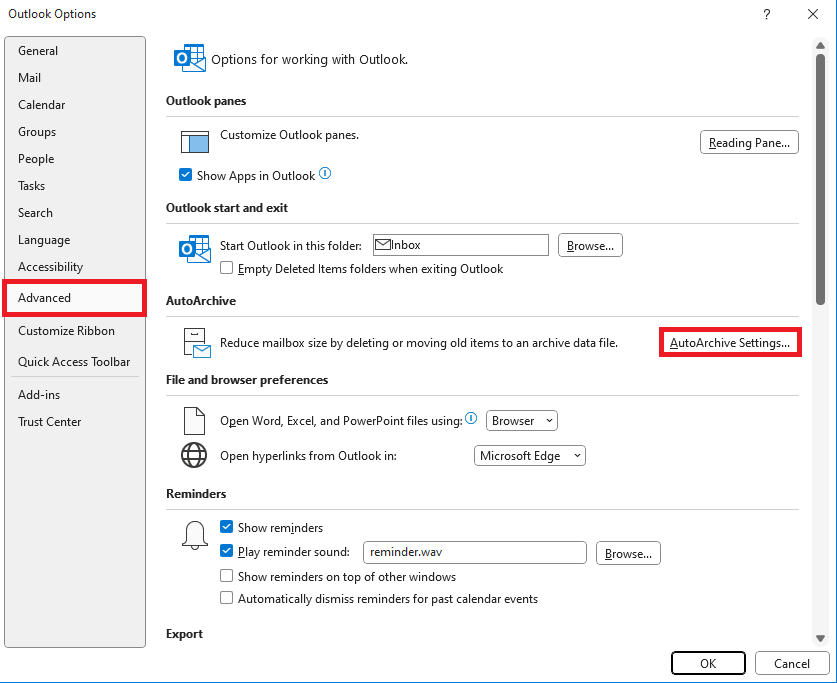
2.1 Set up Auto-Archive setting
- Open the file tab on the Outlook
- click on the options
- Select on Advanced tab
- Then click on the AutoArchive setting
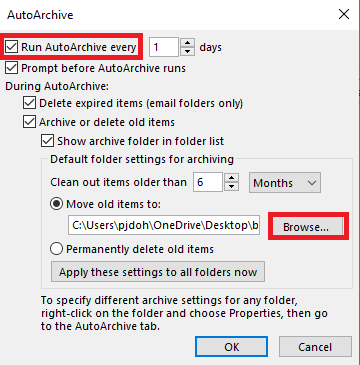
2.2 Select Archive location
- In the Run Auto archive section enter the day so that as per the entered date it will auto-archive the data e.g. (3 months)
- Select the desired locations where you want to save the archived PST files.
- Click ok
Note: – Auto-Archive runs in the background so you won’t see any immediate effect
Also Read : How to Convert OST to PST Free Using PowerShell Commands
3.Drage and Drop Method
Steps
Open Microsoft Outlook.
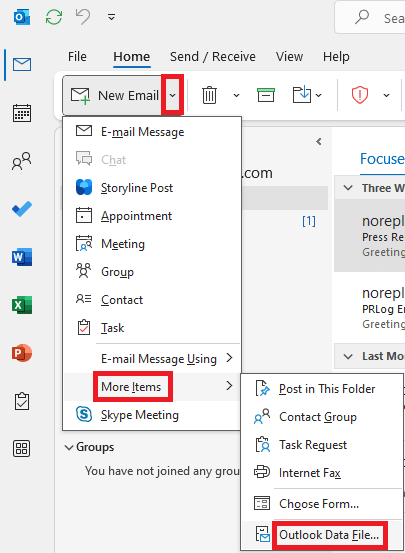
1.Create a new PST file:
- Go to File > New Emails > More Items > Outlook Data File.
-
Specify the file name and select a directory to store it.
2.Move emails, contacts, and other items from your OST file to the newly created PST file by dragging and dropping them.
Limitations of Manual Methods
Access Required: You need access to the Outlook account before converting OST files to PST.
No support for Orphaned OST Files: In the Manual, there is no support for Orphaned or Corrupted files. In that case, I would recommend third-party software like MailsDaddy OST to PST Converter.
Time-Consuming: In the third type drag and drop method you must pick up manually every single file to convert it to the desired format i.e. PST files.
Risk of Data Loss: There is a possibility ad missing data loss during transmission.
Note: It is highly recommended you take a backup or copy of your OST files before converting them to PST. It will act as a safety step in case of mishappen during the conversion process by any means.
Best Third-Party Software (MailsDaddy OST PST Converter)
All the steps outlined for OST to PST conversion rely on Microsoft Outlook’s built-in features. However, these methods have certain limitations, including being time-consuming and potentially prone to errors. To overcome these challenges, third-party tools offer a more efficient and reliable solution for OST to PST conversion.
MailsDaddy OST to PST Converter is a trusted software designed for seamless email backup, data migration, and file transfer. This tool simplifies the conversion process by enabling bulk OST file conversion to PST without compromising the file structure. It includes a preview feature that allows users to select specific files or entire folders for conversion.
Additionally, MailsDaddy OST to PST Converter supports multiple output formats, such as EML, MSG, HTML, and RTF, providing flexibility for various needs. With its advanced features and user-friendly interface, the software ensures a smooth conversion process with no risk of data loss.
Conclusion
Manually converting OST to PST is relatively simple if you can access the original Outlook profile. However, for more challenging cases, such as recovering orphaned or damaged OST files, using professional tools offers a more secure and efficient solution. By following the methods detailed in this guide, you can select the approach that best fits your situation and successfully convert OST files to PST format.
For More Article Visit: Add single or multiple Office 365 accounts via PowerShell.
